去年 2021 年的时候,我的工作主要集中在改进 Lua虚拟机 ,后来由于工作变动,现在主要的工作语言已经切换为了 Python ,因此打算阅读下 Python 3.10 的源码,学习一下它的设计,对比 Lua 的优势。
希望在接下来的阅读过程中,能够体会到一种 回家 的畅快感。
本篇将以 float 作为起点,了解如何创建出一个浮点对象,深入剖析 float 其内部实现。
一切皆对象 一切皆对象 这句话都要被讲烂了,但是还要讲多一次。
Python 是一门面向对象的强类型动态语言,里面的任何东西都是对象,以浮点数为例。
1 2 3 4 5 6 7 8 9 10 11 12 13 14 >>> a = 3.14159 >>> type (a)<class 'float' > >>> float <class 'float' > >>> float ()0.0 >>> type (float )<class 'type' >
以上我们可以确定,Python 中类型也是对象。
此外所有对象的类型都是 type ,可以称其为元类。而所有对象都继承自 object 。
1
2
3
4
5
6
7
8
9
10
11
>>> type (int )<class 'type' > >>> type (dict )<class 'type' > >>> type (list )<class 'type' > >>> float .__base__<class 'object' > >>> dict .__base__<class 'object' >
而 object 的类型也是 type ,type 的类型也为 type。
1
2
3
4
5
>>> type (object )<class 'type' > >>> type (type )<class 'type' >
至此我们可以得出以下几个结论,方便后续继续阅读 float 的实现。
一切皆对象,包括类型也是对象 所有类都继承自 object 所有类的类型都是 type 1 2 3 4 5 >>> type .__base__<class 'object' > >>> object .__class__<class 'type' >
type 的父类也是 objecttype 的类型也是 typeobject 的类型也是 typeobject 的父类为 None两者互为表里,相辅相成。
PyObject 理解了以上的内容,就能开始正式阅读源码了。CPython 为了表示一种继承的关系,但苦于 C语言 没有这种机制,不得不手动模拟,抽出 PyObject 作为父类。
PyObject 的结构相当简单,和 Lua 一样,需要自动垃圾回收,给每个对象头部都加了 double-link ,当创建对象的时候就将所有对象串起来,主要用于扫描与分代垃圾回收。
1 2 3 4 5 6 7 8 9 #define _PyObject_HEAD_EXTRA \ struct _object *_ob_next; \ struct _object *_ob_prev; typedef struct _object { _PyObject_HEAD_EXTRA Py_ssize_t ob_refcnt; PyTypeObject *ob_type; } PyObject;
PyObject 是所有对象的起点,后续任何一个对象都继承自它。它包含双向链表和引用计数(ob_refcnt),通过这两个结构运用了多种垃圾回收机制。
ob_type 则是类型指针,指向该对象真正的类型,表示该对象的一些行为,用于实现多态。
PyVarObject 则是 PyObject 的增强版,用于支持 变长对象 。
1 2 3 4 typedef struct { PyObject ob_base; Py_ssize_t ob_size; } PyVarObject;
之所以需要 变长对象 是因为有的类型是一个容器,需要存储动态变更大小,例如 List 。既然 PyVarObject 是变长对象,那么 PyObject 就可以看作是定长对象。
PyTypeObject 前面我们知道,在 Python 的世界中,类型也是对象,实例是由类型对象生成出来的。 PyTypeObject 就是所谓的类型实例对象, PyType_Type 则是类型的类型对象,它用于表示该类型的一些行为,生成出来的实例也会遵循它的规则进行,一定要先搞清楚这两者的关系,才好去理解 Python。
具体的 PyTypeObject 结构在此处先不展开,留到后续阅读各个内建对象时,再解释说明。
1 2 3 4 5 6 7 8 9 10 #define PyObject_VAR_HEAD PyVarObject ob_base; typedef struct _typeobject PyTypeObject ;struct _typeobject { PyObject_VAR_HEAD const char *tp_name; Py_ssize_t tp_basicsize, tp_itemsize; ... };
在 Python 虚拟机启动后,内建类型对象就可以拿来实例化对象了,这说明内建类型对象是在启动时就准备好了。
而 PyType_Type 就是提前准备好的类型对象。
1 2 3 4 5 6 7 8 9 10 11 12 13 14 15 16 17 18 19 20 21 22 23 24 25 26 27 28 29 30 31 32 33 34 35 36 37 38 39 40 41 42 43 44 45 46 47 48 49 50 51 52 53 54 55 56 57 58 59 60 #define _PyObject_EXTRA_INIT 0, 0, #define PyObject_HEAD_INIT(type) \ { _PyObject_EXTRA_INIT \ 1, type }, #define PyVarObject_HEAD_INIT(type, size) \ { PyObject_HEAD_INIT(type) size }, PyDoc_STRVAR(type_doc, "type(object) -> the object's type\n" "type(name, bases, dict, **kwds) -> a new type" );PyTypeObject PyType_Type = { PyVarObject_HEAD_INIT(&PyType_Type, 0 ) "type" , sizeof (PyHeapTypeObject), sizeof (PyMemberDef), (destructor)type_dealloc, offsetof(PyTypeObject, tp_vectorcall), 0 , 0 , 0 , (reprfunc)type_repr, &type_as_number, 0 , 0 , 0 , (ternaryfunc)type_call, 0 , (getattrofunc)type_getattro, (setattrofunc)type_setattro, 0 , Py_TPFLAGS_DEFAULT | Py_TPFLAGS_HAVE_GC | Py_TPFLAGS_BASETYPE | Py_TPFLAGS_TYPE_SUBCLASS | Py_TPFLAGS_HAVE_VECTORCALL, type_doc, (traverseproc)type_traverse, (inquiry)type_clear, 0 , offsetof(PyTypeObject, tp_weaklist), 0 , 0 , type_methods, type_members, type_getsets, 0 , 0 , 0 , 0 , offsetof(PyTypeObject, tp_dict), type_init, 0 , type_new, PyObject_GC_Del, (inquiry)type_is_gc, .tp_vectorcall = type_vectorcall, };
我们可以看出,type 的类型还是 type。其次有好多地方都是空的,这是因为有的参数是等到用到的时候再添加,由 PyType_Ready 函数完成,内置对象都会在 _PyTypes_Init 时就已经初始化好。
现在,我们已经知道 所有的对象都是先由 type 这一元类生成,那么对象是怎么被生成的?
对象生成主要有两种方式,一种是调用类型对象,也就是使用类型对象的 __call__ ,另一种则是在语法分析时,就可确定该对象的类型,直接调用内部的CAPI(对应指令为 LOAD_CONST)。
1 2 3 4 5 6 7 8 >>> float (1.5 )1.5 >>> f = 1.5 >>> f1.5
这两种的区别主要在于性能上,在语法分析阶段直接能确定类型的,会比调用类型对象生成的要快的多。
float(1.5) ⇒ float.__class__.__call__(float, 1.5) ⇒ type.__call__(float, 1.5) ⇒ type_call(float, 1.5) 而在 type_call 中还会去检查是否可以转换为 float 对象,自然就慢了。
f = 1.5 ⇒ PyFloat_FromDouble(1.5) 一步到位,没有更多的类型判断。
怎么证明以上的结论呢?有个很简单的方法。
1 2 3 4 5 6 7 >>> print (float .__call__)<method-wrapper '__call__' of type object at 0x103f65d70 > >>> print (int .__call__)<method-wrapper '__call__' of type object at 0x103f67f90 > >>> print (type .__call__)<slot wrapper '__call__' of 'type' objects>
可以看出 类型对象的 __call__ 实际上就是 type 的 __call__ 。同时我们还可以知道,结构体中的 slot 的函数指针,在 Python 的世界中也是对象! PyWrapperDescrObject 对函数指针进行包装还加了一些描述。
有了以上的前置知识,接下来就是要关注一个对象的创建流程了,从 type_call 函数开始阅读,因为 type 的 __call__ 调用的是 type_call 。
1 2 3 4 5 6 7 8 9 10 11 12 13 14 15 16 17 18 19 20 21 22 23 24 25 26 27 28 29 30 31 32 33 34 35 36 37 38 39 40 41 42 43 44 45 46 47 static PyObject *type_call (PyTypeObject *type, PyObject *args, PyObject *kwds) { PyObject *obj; PyThreadState *tstate = _PyThreadState_GET(); if (type == &PyType_Type) { Py_ssize_t nargs = PyTuple_GET_SIZE(args); if (nargs == 1 && (kwds == NULL || !PyDict_GET_SIZE(kwds))) { obj = (PyObject *) Py_TYPE(PyTuple_GET_ITEM(args, 0 )); Py_INCREF(obj); return obj; } if (nargs != 3 ) { PyErr_SetString(PyExc_TypeError, "type() takes 1 or 3 arguments" ); return NULL ; } } if (type->tp_new == NULL ) { _PyErr_Format(tstate, PyExc_TypeError, "cannot create '%s' instances" , type->tp_name); return NULL ; } obj = type->tp_new(type, args, kwds); obj = _Py_CheckFunctionResult(tstate, (PyObject*)type, obj, NULL ); if (obj == NULL ) return NULL ; if (!PyType_IsSubtype(Py_TYPE(obj), type)) return obj; type = Py_TYPE(obj); if (type->tp_init != NULL ) { int res = type->tp_init(obj, args, kwds); if (res < 0 ) { Py_DECREF(obj); obj = NULL ; } } return obj; }
这么看就简单多了,通过调用类型对象进行实例化,会先执行 __new__ ,若返回的类型正确则继续调用 __init__。
PyBaseObject 如果说 PyTypeObject 是万物的元类,那么 PyBaseObject 就是万物的父类。而父也是由造物主 type 创造出来的,它们两是一体,不可分割(因为 object 的类型 也是 type)。
整体上看非常普通,没什么特别的,主要是定义了一些最基础的方法,给子类用,比如比较之类的。
1 2 3 4 5 6 7 8 9 10 11 12 13 14 15 16 17 18 19 20 21 22 23 24 25 26 27 28 29 30 31 32 33 34 35 36 37 38 39 40 41 42 43 44 45 46 47 PyDoc_STRVAR(object_doc, "object()\n--\n\n" "The base class of the class hierarchy.\n\n" "When called, it accepts no arguments and returns a new featureless\n" "instance that has no instance attributes and cannot be given any.\n" );PyTypeObject PyBaseObject_Type = { PyVarObject_HEAD_INIT(&PyType_Type, 0 ) "object" , sizeof (PyObject), 0 , object_dealloc, 0 , 0 , 0 , 0 , object_repr, 0 , 0 , 0 , (hashfunc)_Py_HashPointer, 0 , object_str, PyObject_GenericGetAttr, PyObject_GenericSetAttr, 0 , Py_TPFLAGS_DEFAULT | Py_TPFLAGS_BASETYPE, object_doc, 0 , 0 , object_richcompare, 0 , 0 , 0 , object_methods, 0 , object_getsets, 0 , 0 , 0 , 0 , 0 , object_init, PyType_GenericAlloc, object_new, PyObject_Del, };
现在不去关注这里面的内容,等到对其他的对象足够了解后,再回到 type 和 object 中剖析。这样做的好处是,自上而下阅读,不容易产生疑惑。
PyFloatObject 终于到了本文的重点,PyFloatObject 是一个浮点数实例对象,我们就以它为起点,去窥探其中的设计。之所以选择它,是因为它是所有对象里面最简单的了。
1 2 3 4 5 6 typedef struct { PyObject_HEAD double ob_fval; } PyFloatObject;
PyFloat_Type 看命名就知道是浮点数的类型对象了。
里面的行为都比较简单,要注意的是没有 __init__ ,因为浮点对象比较简单,可以在 __new__ 的时候就填充好。
1 2 3 4 5 6 7 8 9 10 11 12 13 14 15 16 17 18 19 20 21 22 23 24 25 26 27 28 29 30 31 32 33 34 35 36 37 38 39 40 41 42 43 44 45 46 47 48 49 50 51 52 53 54 55 56 PyTypeObject PyFloat_Type = { PyVarObject_HEAD_INIT(&PyType_Type, 0 ) "float" , sizeof (PyFloatObject), 0 , (destructor)float_dealloc, 0 , 0 , 0 , 0 , (reprfunc)float_repr, &float_as_number, 0 , 0 , (hashfunc)float_hash, 0 , 0 , PyObject_GenericGetAttr, 0 , 0 , Py_TPFLAGS_DEFAULT | Py_TPFLAGS_BASETYPE | _Py_TPFLAGS_MATCH_SELF, float_new__doc__, 0 , 0 , float_richcompare, 0 , 0 , 0 , float_methods, 0 , float_getset, 0 , 0 , 0 , 0 , 0 , 0 , 0 , float_new, .tp_vectorcall = (vectorcallfunc)float_vectorcall, };
为了接下来阅读方便,我将 floatobject.h 的一部分宏作了注释贴上来。
1 2 3 4 5 6 7 8 9 10 11 12 13 14 15 16 17 18 19 20 21 22 23 24 25 26 27 28 #ifndef PyFloat_MAXFREELIST # define PyFloat_MAXFREELIST 100 #endif #define PyFloat_Check(op) PyObject_TypeCheck(op, &PyFloat_Type) #define PyFloat_CheckExact(op) Py_IS_TYPE(op, &PyFloat_Type) #ifdef Py_NAN #define Py_RETURN_NAN return PyFloat_FromDouble(Py_NAN) #endif #define Py_RETURN_INF(sign) do \ if (copysign(1., sign) == 1.) { \ return PyFloat_FromDouble(Py_HUGE_VAL); \ } else { \ return PyFloat_FromDouble(-Py_HUGE_VAL); \ } while(0) #ifndef Py_LIMITED_API #define PyFloat_AS_DOUBLE(op) (((PyFloatObject *)(op))->ob_fval) #endif
浮点数初始化 虚拟机在启动后,会进行浮点数的一些初始化,主要包含以下两个操作
判断当前机器为 ieee-754 的大端还是小端编码。 1 2 3 4 5 6 7 8 9 10 11 12 13 14 15 16 17 18 19 20 21 22 23 24 25 26 27 28 29 30 void _PyFloat_Init(void ) { #if SIZEOF_DOUBLE == 8 { double x = 9006104071832581.0 ; if (memcmp (&x, "\x43\x3f\xff\x01\x02\x03\x04\x05" , 8 ) == 0 ) detected_double_format = ieee_big_endian_format; else if (memcmp (&x, "\x05\x04\x03\x02\x01\xff\x3f\x43" , 8 ) == 0 ) detected_double_format = ieee_little_endian_format; else detected_double_format = unknown_format; } #else detected_double_format = unknown_format; #endif ... double_format = detected_double_format; float_format = detected_float_format; }
填充 float info 数据。 1 2 3 4 5 6 7 8 9 10 11 12 13 14 15 16 17 18 19 20 21 22 23 24 25 26 27 28 29 30 31 32 33 34 35 36 37 38 39 40 41 42 43 44 45 46 47 48 PyDoc_STRVAR(floatinfo__doc__, "sys.float_info\n\ \n\ A named tuple holding information about the float type. It contains low level\n\ information about the precision and internal representation. Please study\n\ your system's :file:`float.h` for more information." );static PyStructSequence_Field floatinfo_fields[] = { {"max" , "DBL_MAX -- maximum representable finite float" }, {"max_exp" , "DBL_MAX_EXP -- maximum int e such that radix**(e-1) " "is representable" }, {"max_10_exp" , "DBL_MAX_10_EXP -- maximum int e such that 10**e " "is representable" }, {"min" , "DBL_MIN -- Minimum positive normalized float" }, {"min_exp" , "DBL_MIN_EXP -- minimum int e such that radix**(e-1) " "is a normalized float" }, {"min_10_exp" , "DBL_MIN_10_EXP -- minimum int e such that 10**e is " "a normalized" }, {"dig" , "DBL_DIG -- maximum number of decimal digits that " "can be faithfully represented in a float" }, {"mant_dig" , "DBL_MANT_DIG -- mantissa digits" }, {"epsilon" , "DBL_EPSILON -- Difference between 1 and the next " "representable float" }, {"radix" , "FLT_RADIX -- radix of exponent" }, {"rounds" , "FLT_ROUNDS -- rounding mode used for arithmetic " "operations" }, {0 } }; static PyStructSequence_Desc floatinfo_desc = { "sys.float_info" , floatinfo__doc__, floatinfo_fields, 11 }; int _PyFloat_InitTypes(void ) { if (FloatInfoType.tp_name == NULL ) { if (PyStructSequence_InitType2(&FloatInfoType, &floatinfo_desc) < 0 ) { return -1 ; } } return 0 ; }
这样就可以通过 sys.float_info 来查看当前环境的浮点数参数。
1
2
3
>>> import sys>>> sys.float_infosys.float_info(max =1.7976931348623157e+308 , max_exp=1024 , max_10_exp=308 , min =2.2250738585072014e-308 , min_exp=-1021 , min_10_exp=-307 , dig=15 , mant_dig=53 , epsilon=2.220446049250313e-16 , radix=2 , rounds=1 )
浮点数的创建与销毁 浮点数创建 浮点数创建主要在 float_new_impl 中。
1
2
3
4
5
6
7
8
9
10
11
12
13
14
15
16
17
18
19
20
21
22
23
static PyObject *float_new (PyTypeObject *type, PyObject *args, PyObject *kwargs) { PyObject *return_value = NULL ; PyObject *x = NULL ; if ((type == &PyFloat_Type) && !_PyArg_NoKeywords("float" , kwargs)) { goto exit ; } if (!_PyArg_CheckPositional("float" , PyTuple_GET_SIZE(args), 0 , 1 )) { goto exit ; } if (PyTuple_GET_SIZE(args) < 1 ) { goto skip_optional; } x = PyTuple_GET_ITEM(args, 0 ); skip_optional: return_value = float_new_impl(type, x); exit : return return_value; }
判断类型是否为 float_type,不是则看看是否为 float 的子类,否则就尝试将字符串转为浮点数。
1
2
3
4
5
6
7
8
9
10
11
12
13
14
15
16
17
18
19
static PyObject *float_new_impl (PyTypeObject *type, PyObject *x) { if (type != &PyFloat_Type) { if (x == NULL ) { x = _PyLong_GetZero(); } return float_subtype_new(type, x); } if (x == NULL ) { return PyFloat_FromDouble(0.0 ); } if (PyUnicode_CheckExact(x)) return PyFloat_FromString(x); return PyNumber_Float(x); }
重点关注 PyFloat_FromDouble ,可以看出,float 有个对象缓存链表,各个对象采用 ob_type 进行串联。
1 2 3 4 5 6 7 8 9 10 11 12 13 14 15 16 17 18 19 20 21 22 PyObject * PyFloat_FromDouble (double fval) { struct _Py_float_state *state = PyFloatObject *op = state->free_list; if (op != NULL ) { state->free_list = (PyFloatObject *) Py_TYPE(op); state->numfree--; } else { op = PyObject_Malloc(sizeof (PyFloatObject)); if (!op) { return PyErr_NoMemory(); } } _PyObject_Init((PyObject*)op, &PyFloat_Type); op->ob_fval = fval; return (PyObject *) op; }
float_vectorcall 除了 float_new 还有一个创建 浮点数的新方法 float_vectorcall ,内部也是调用的 float_new_impl ,用于提高性能,但是浮点数里面没有启用!因为它的 flag 没有 Py_TPFLAGS_HAVE_VECTORCALL ,可能只是暂时预留一个位置,还没有开发到,所以就先跳过吧
浮点数销毁 1 2 3 4 5 6 7 8 9 10 11 12 13 14 15 16 17 18 19 20 static void float_dealloc (PyFloatObject *op) { if (PyFloat_CheckExact(op)) { struct _Py_float_state *state = if (state->numfree >= PyFloat_MAXFREELIST) { PyObject_Free(op); return ; } state->numfree++; Py_SET_TYPE(op, (PyTypeObject *)state->free_list); state->free_list = op; } else { Py_TYPE(op)->tp_free((PyObject *)op); } }
如何验证浮点数是不是真的用到了缓存池?有个很简单的方法验证。
1
2
3
4
5
6
7
8
>>> a = 1.3 >>> id (a)4500913328 >>> del a>>> b = 1.3 >>> id (b)4500913328
a 与 b 的 id 一致 说明复用了浮点数对象。
浮点数操作 浮点数的大部分操作都比较简单,唯独比较操作是一个非常麻烦的操作。
浮点数比较 作者也曾提到,浮点数比较是一个噩梦,之所以这么麻烦,主要是当浮点数和整数比较时,将浮点数转换为整数去比较会丢失精度,用整数转换为浮点数也不可行,因为一个整数的有效位高达63位,而双精度浮点数的有效位为53位,无法直接进行比较。
大致步骤如下:
如果 j 为浮点数 且 无穷,则可直接判定。 如果 j 为整数 则检查符号,符号不同也可直接判定。 j 为整数且符号相同,判定是否可以转换为浮点数(通过计算 整数的比特位,只要不超过48位,就可直接转换为浮点数),后直接判定。 若j为负数,转换为整数,计算 i 的指数,指数小于 j 的位数,则可直接判定(因为指数也可以看作是位数)。 j为整数,分离 i 这个浮点数的小数与整数部分,如果小数部分存在,则将 i 左移后异或上 1,保留精度后与j左移一位进行判定即可。 1 2 3 4 5 6 7 8 9 10 11 12 13 14 15 16 17 18 19 20 21 22 23 24 25 26 27 28 29 30 31 32 33 34 35 36 37 38 39 40 41 42 43 44 45 46 47 48 49 50 51 52 53 54 55 56 57 58 59 60 61 62 63 64 65 66 67 68 69 70 71 72 73 74 75 76 77 78 79 80 81 82 83 84 85 86 87 88 89 90 91 92 93 94 95 96 97 98 99 100 101 102 103 104 105 106 107 108 109 110 111 112 113 114 115 116 117 118 119 120 121 122 123 124 125 126 127 128 129 130 131 132 133 134 135 136 137 138 139 140 141 142 143 144 145 146 147 static PyObject*float_richcompare (PyObject *v, PyObject *w, int op) { double i, j; int r = 0 ; assert(PyFloat_Check(v)); i = PyFloat_AS_DOUBLE(v); if (PyFloat_Check(w)) j = PyFloat_AS_DOUBLE(w); else if (!Py_IS_FINITE(i)) { if (PyLong_Check(w)) j = 0.0 ; else goto Unimplemented; } else if (PyLong_Check(w)) { int vsign = i == 0.0 ? 0 : i < 0.0 ? -1 : 1 ; int wsign = _PyLong_Sign(w); size_t nbits; int exponent; if (vsign != wsign) { i = (double )vsign; j = (double )wsign; goto Compare; } nbits = _PyLong_NumBits(w); if (nbits == (size_t )-1 && PyErr_Occurred()) { PyErr_Clear(); i = (double )vsign; assert(wsign != 0 ); j = wsign * 2.0 ; goto Compare; } if (nbits <= 48 ) { j = PyLong_AsDouble(w); assert(j != -1.0 || ! PyErr_Occurred()); goto Compare; } if (vsign < 0 ) { i = -i; op = _Py_SwappedOp[op]; } assert(i > 0.0 ); (void ) frexp (i, &exponent); if (exponent < 0 || (size_t )exponent < nbits) { i = 1.0 ; j = 2.0 ; goto Compare; } if ((size_t )exponent > nbits) { i = 2.0 ; j = 1.0 ; goto Compare; } { double fracpart; double intpart; PyObject *result = NULL ; PyObject *vv = NULL ; PyObject *ww = w; if (wsign < 0 ) { ww = PyNumber_Negative(w); if (ww == NULL ) goto Error; } else Py_INCREF(ww); fracpart = modf (i, &intpart); vv = PyLong_FromDouble(intpart); if (vv == NULL ) goto Error; if (fracpart != 0.0 ) { PyObject *temp; temp = _PyLong_Lshift(ww, 1 ); if (temp == NULL ) goto Error; Py_DECREF(ww); ww = temp; temp = _PyLong_Lshift(vv, 1 ); if (temp == NULL ) goto Error; Py_DECREF(vv); vv = temp; temp = PyNumber_Or(vv, _PyLong_GetOne()); if (temp == NULL ) goto Error; Py_DECREF(vv); vv = temp; } r = PyObject_RichCompareBool(vv, ww, op); if (r < 0 ) goto Error; result = PyBool_FromLong(r); Error: Py_XDECREF(vv); Py_XDECREF(ww); return result; } } else goto Unimplemented; Compare: switch (op) { case Py_EQ: r = i == j; break ; case Py_NE: r = i != j; break ; case Py_LE: r = i <= j; break ; case Py_GE: r = i >= j; break ; case Py_LT: r = i < j; break ; case Py_GT: r = i > j; break ; } return PyBool_FromLong(r); Unimplemented: Py_RETURN_NOTIMPLEMENTED; }
看完这一段我就有疑惑了,我记得 Lua 实现浮点数比较非常简单啊。翻阅 Lua 5.3.6 源码进行查阅得知,Lua 直接将两个浮点数转换为整数进行比较,这样会有精度丢失的问题(将浮点直接向下取整取到整数)。
1
2
3
4
5
6
7
8
9
10
int luaV_equalobj (lua_State *L, const TValue *t1, const TValue *t2) { const TValue *tm; if (ttype(t1) != ttype(t2)) { if (ttnov(t1) != ttnov(t2) || ttnov(t1) != LUA_TNUMBER) return 0 ; else { lua_Integer i1, i2; return (tointeger(t1, &i1) && tointeger(t2, &i2) && i1 == i2); } }
copysign copysign 是 ieee-754 中关于浮点数定义的一个辅助函数,用于确定一个浮点数的符号,在 Python 中为了支持符号0,实现了这个方法。
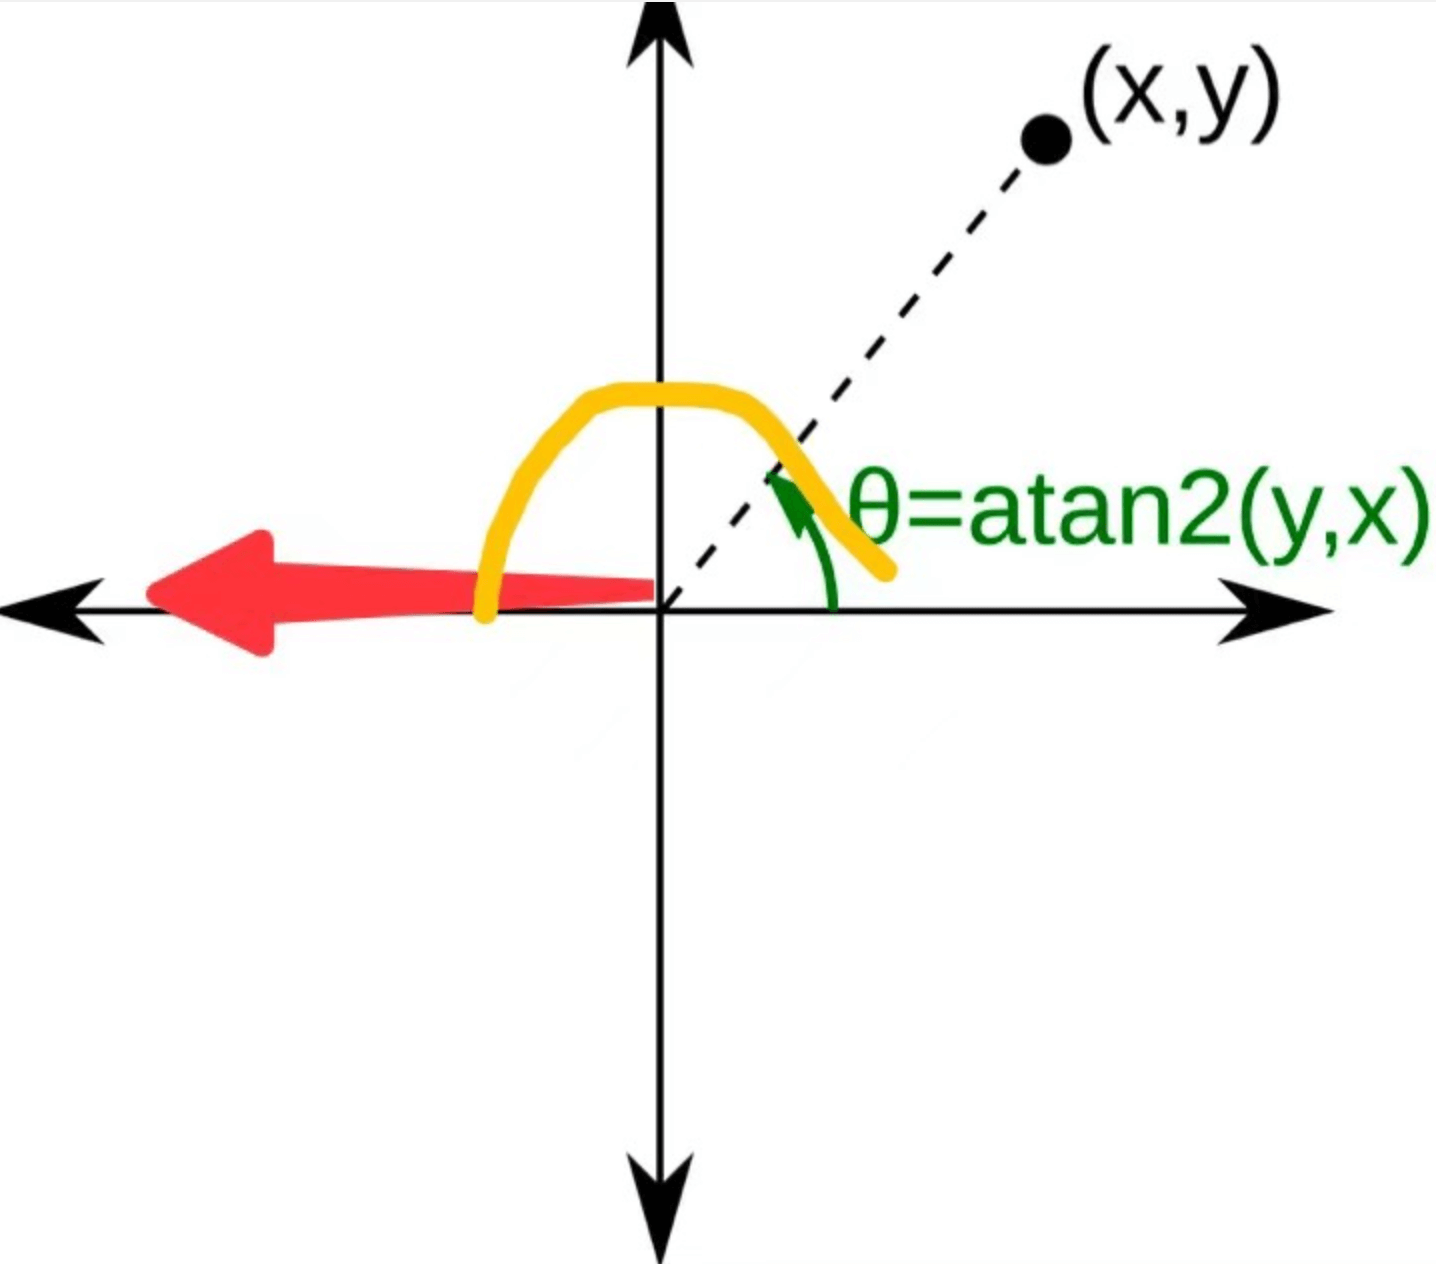
这个函数使用方法是 将 y 的符号赋给 x 并返回。atan2(0, -1.) 会得到一个 -PI 的结果,如果机器支持-0,则为-PI,若不支持则为 +PI,以此来确定机器是否支持符号0。
1
2
3
4
5
6
7
8
9
10
double copysign (double x, double y) { if (y > 0. || (y == 0. && atan2 (y, -1. ) > 0. )) { return fabs (x); } else { return -fabs (x); } }
总结 本篇剖析了 Python3.10 的 float 对象的内部结构与实现,对比 Lua 可知其优势。
拥有浮点数缓存池。 比较函数实现更为靠谱。 考虑到机器是否支持符号0,通过 copysign 实现。