在上一篇关于 Python3 源码剖析中,剖析 float 的实现主要是阅读的 Python 3.10 的源码,但是在我看到 PEP-659 这篇关于指令特化(Specializing Adaptive Interpreter)的提案时,我就被它吸引了,因为这就是我之前想给 Lua 提速加的功能之一,冲着对它的热情,我决定将阅读的 CPython 版本提升到 3.11 ,这一篇就来剖析一下指令特化的实现,我们将通过两个对象做加法进行分析。
对象相加
首先通过 Python 自带的 dis 工具进行分析,分析两个对象相加的流程。
1
2
3
4
5
6
7
8
9
10
11
12
13
14
15
16
17
| from dis import *
def test():
a = 1.5
c = a + 1.3
print(dis(test))
3 0 RESUME 0
4 2 LOAD_CONST 1 (1.5)
4 STORE_FAST 0 (a)
5 6 LOAD_FAST 0 (a)
8 LOAD_CONST 2 (1.3)
10 BINARY_OP 5 (*)
14 POP_TOP
16 LOAD_CONST 0 (None)
18 RETURN_VALUE
|
可以看到两个对象相乘的指令码为 BINARY_OP ,我们跟踪到 CPython 中,可以确定会调用到 PyNumber_Add 函数中。
1
2
3
4
5
6
7
8
9
10
11
12
13
14
15
16
17
18
19
| static const binaryfunc binary_ops[] = {
[NB_ADD] = PyNumber_Add,
[NB_AND] = PyNumber_And,
.....
};
TARGET(BINARY_OP) {
PREDICTED(BINARY_OP);
PyObject *rhs = POP();
PyObject *lhs = TOP();
PyObject *res = binary_ops[oparg](lhs, rhs);
Py_DECREF(lhs);
Py_DECREF(rhs);
SET_TOP(res);
if (res == NULL) {
goto error;
}
JUMPBY(INLINE_CACHE_ENTRIES_BINARY_OP);
DISPATCH();
}
|
PyNumber_Add 实现也很简单,先看看这两个对象支不支持该二元运算符,不支持,则看看支不支持 concat 操作。
1
2
3
4
5
6
7
8
9
10
11
12
13
14
15
16
17
18
| PyObject *
PyNumber_Add(PyObject *v, PyObject *w)
{
PyObject *result = BINARY_OP1(v, w, NB_SLOT(nb_add), "+");
if (result != Py_NotImplemented) {
return result;
}
Py_DECREF(result);
PySequenceMethods *m = Py_TYPE(v)->tp_as_sequence;
if (m && m->sq_concat) {
result = (*m->sq_concat)(v, w);
assert(_Py_CheckSlotResult(v, "+", result != NULL));
return result;
}
return binop_type_error(v, w, "+");
}
|
binary_op1 则是分别对左右两个对象进行判定,查看是否支持相加的操作。
1
2
3
4
5
6
7
8
9
10
11
12
13
14
15
16
17
18
19
20
21
22
23
24
25
26
27
28
29
30
31
32
33
34
35
36
37
38
39
40
41
42
43
44
45
46
47
48
49
50
51
52
| static PyObject *
binary_op1(PyObject *v, PyObject *w, const int op_slot
#ifndef NDEBUG
, const char *op_name
#endif
)
{
binaryfunc slotv;
if (Py_TYPE(v)->tp_as_number != NULL) {
slotv = NB_BINOP(Py_TYPE(v)->tp_as_number, op_slot);
}
else {
slotv = NULL;
}
binaryfunc slotw;
if (!Py_IS_TYPE(w, Py_TYPE(v)) && Py_TYPE(w)->tp_as_number != NULL) {
slotw = NB_BINOP(Py_TYPE(w)->tp_as_number, op_slot);
if (slotw == slotv) {
slotw = NULL;
}
}
else {
slotw = NULL;
}
if (slotv) {
PyObject *x;
if (slotw && PyType_IsSubtype(Py_TYPE(w), Py_TYPE(v))) {
x = slotw(v, w);
if (x != Py_NotImplemented)
return x;
Py_DECREF(x);
slotw = NULL;
}
x = slotv(v, w);
assert(_Py_CheckSlotResult(v, op_name, x != NULL));
if (x != Py_NotImplemented) {
return x;
}
Py_DECREF(x);
}
if (slotw) {
PyObject *x = slotw(v, w);
assert(_Py_CheckSlotResult(w, op_name, x != NULL));
if (x != Py_NotImplemented) {
return x;
}
Py_DECREF(x);
}
Py_RETURN_NOTIMPLEMENTED;
}
|
可以看出一个小小的二元运算,需要经历以下几个过程。
- 确定二元运算的类型(加法)。
- 确定两个对象的类型,查看两个对象是否支持加法。
- 确定是否支持
concat。
如果有一个办法可以提前知道这两个对象的类型,提前确定它们的二元运算是什么就好了,这样就可以绕过一系列的条件判断语句,直达核心,省去大量的预测分支,从而提高性能。
指令特化
思路
经过前面的背景铺垫,我们可以先试想一下,如何去做指令特化?
首先要明确地是什么时候做指令特化?如果每个函数执行的时候都做一次指令特化,那么很可能会消耗更多的时间,这点和 JIT 的思路一致,只有对调用频率高的函数做优化才有意义。
其次要明确指令特化失败了怎么办?因为 Python 是脚本语言,很可能下次传进来的对象不再是原来的那个类型了,这个时候就可能会发生指令特化失效的情况,但是如果每次都在指令特化后的执行流程中检查对象的类型,那又回到了老路子,性能可能提升不了,解决这个问题的思路是,在指令后面缓存一些数据,减少条件判断的个数。
实战
接下来我们将开始实战指令特化,首先根据前面分析,我们需要记录每个对象的执行次数,还记得前面的字节码吗?RESUME 就是拿来做这个事情的。
在编译生成字节码阶段,每当进入一个新的作用域时,就会创建一个 RESUME 的指令,这是新版本中特有的。
1
2
3
4
5
6
7
| static int
compiler_enter_scope(struct compiler *c, identifier name,
int scope_type, void *key, int lineno)
{
....
ADDOP_I(c, RESUME, 0);
}
|
可以看出,co_warmup 会在每次进入该作用域时自增,当其为 0 时,进行 quicken 操作。其默认值目前为 -8 。
1
2
3
4
5
6
7
8
9
10
11
12
13
14
15
16
17
18
| #define QUICKENING_WARMUP_DELAY 8
#define QUICKENING_INITIAL_WARMUP_VALUE (-QUICKENING_WARMUP_DELAY)
static inline void
_PyCode_Warmup(PyCodeObject *code)
{
if (code->co_warmup != 0) {
code->co_warmup++;
if (code->co_warmup == 0) {
_PyCode_Quicken(code);
}
}
}
TARGET(RESUME) {
_PyCode_Warmup(frame->f_code);
JUMP_TO_INSTRUCTION(RESUME_QUICK);
}
|
那么 quicken 操作是什么呢?其实就是将原本的指令替换为 自适应 指令,自适应指令也会有个变量记录进入该指令的次数,当达到一定次数时,才考虑将其进行特化。之所以不在一开始就生成 自适应的二元操作指令,主要是避免一些性能损耗吧,毕竟有一些函数调用次数少。
1
2
3
4
5
6
7
8
9
10
11
12
13
14
15
16
17
18
19
20
21
22
23
24
25
26
27
28
29
30
31
32
33
34
35
36
37
38
39
40
41
42
43
| uint8_t _PyOpcode_Adaptive[256] = {
[LOAD_ATTR] = LOAD_ATTR_ADAPTIVE,
[LOAD_GLOBAL] = LOAD_GLOBAL_ADAPTIVE,
[LOAD_METHOD] = LOAD_METHOD_ADAPTIVE,
[BINARY_SUBSCR] = BINARY_SUBSCR_ADAPTIVE,
[STORE_SUBSCR] = STORE_SUBSCR_ADAPTIVE,
[CALL] = CALL_ADAPTIVE,
[PRECALL] = PRECALL_ADAPTIVE,
[STORE_ATTR] = STORE_ATTR_ADAPTIVE,
[BINARY_OP] = BINARY_OP_ADAPTIVE,
[COMPARE_OP] = COMPARE_OP_ADAPTIVE,
[UNPACK_SEQUENCE] = UNPACK_SEQUENCE_ADAPTIVE,
};
void
_PyCode_Quicken(PyCodeObject *code)
{
_Py_QuickenedCount++;
int previous_opcode = -1;
_Py_CODEUNIT *instructions = _PyCode_CODE(code);
for (int i = 0; i < Py_SIZE(code); i++) {
int opcode = _Py_OPCODE(instructions[i]);
uint8_t adaptive_opcode = _PyOpcode_Adaptive[opcode];
if (adaptive_opcode) {
_Py_SET_OPCODE(instructions[i], adaptive_opcode);
assert(instructions[i + 1] == 0);
previous_opcode = -1;
i += _PyOpcode_Caches[opcode];
}
else {
assert(!_PyOpcode_Caches[opcode]);
switch (opcode) {
....
case RESUME:
_Py_SET_OPCODE(instructions[i], RESUME_QUICK);
break;
....
}
previous_opcode = opcode;
}
}
}
|
在此处 BINARY_OP 的自适应指令则为 BINARY_OP_ADAPTIVE ,同时细心的读者可以发现,在 quicken 过程中,还会将 RESUME 替换为 RESUME_QUICK 这主要是因为,既然都已经决定特化了这个函数了,我再每次都去算进入这个函数多少次,意义不大,想办法将其特化掉,省去一部分性能损耗。
BINARY_OP_ADAPTIVE 在这条指令后面藏了一个缓存,存储了当前指令还差多少次进行特化(我猜测是因为与0对比的时候,运算的比较快),当 counter 为0时,进行特化。
目前默认的 counter 为 53,作者说:大了优化的少,小了整天优化,只有50附近比较靠谱,但是又不想选50,就选了个53质数。
当回退的时候,指令特化失败时,会被修改为 64 。
1
2
3
4
5
6
7
8
9
10
11
12
13
14
| TARGET(BINARY_OP_ADAPTIVE) {
_PyBinaryOpCache *cache = (_PyBinaryOpCache *)next_instr;
if (cache->counter == 0) {
PyObject *lhs = SECOND();
PyObject *rhs = TOP();
next_instr--;
_Py_Specialize_BinaryOp(lhs, rhs, next_instr, oparg, &GETLOCAL(0));
DISPATCH();
}
else {
cache->counter--;
JUMP_TO_INSTRUCTION(BINARY_OP);
}
}
|
_Py_Specialize_BinaryOp 的过程也非常简单,就是检查对象类型,还有操作类型,进行决策即可。
1
2
3
4
5
6
7
8
9
10
11
12
13
14
15
16
17
18
19
20
21
22
23
24
25
26
27
28
29
30
31
32
33
34
35
36
37
38
39
40
41
42
43
44
45
46
47
48
49
50
51
52
53
54
55
56
57
58
59
60
61
62
63
64
65
66
67
68
69
70
71
72
73
74
| void
_Py_Specialize_BinaryOp(PyObject *lhs, PyObject *rhs, _Py_CODEUNIT *instr,
int oparg, PyObject **locals)
{
assert(_PyOpcode_Caches[BINARY_OP] == INLINE_CACHE_ENTRIES_BINARY_OP);
_PyBinaryOpCache *cache = (_PyBinaryOpCache *)(instr + 1);
switch (oparg) {
case NB_ADD:
case NB_INPLACE_ADD:
if (!Py_IS_TYPE(lhs, Py_TYPE(rhs))) {
break;
}
if (PyUnicode_CheckExact(lhs)) {
_Py_CODEUNIT next = instr[INLINE_CACHE_ENTRIES_BINARY_OP + 1];
bool to_store = (_Py_OPCODE(next) == STORE_FAST ||
_Py_OPCODE(next) == STORE_FAST__LOAD_FAST);
if (to_store && locals[_Py_OPARG(next)] == lhs) {
_Py_SET_OPCODE(*instr, BINARY_OP_INPLACE_ADD_UNICODE);
goto success;
}
_Py_SET_OPCODE(*instr, BINARY_OP_ADD_UNICODE);
goto success;
}
if (PyLong_CheckExact(lhs)) {
_Py_SET_OPCODE(*instr, BINARY_OP_ADD_INT);
goto success;
}
if (PyFloat_CheckExact(lhs)) {
_Py_SET_OPCODE(*instr, BINARY_OP_ADD_FLOAT);
goto success;
}
break;
case NB_MULTIPLY:
case NB_INPLACE_MULTIPLY:
if (!Py_IS_TYPE(lhs, Py_TYPE(rhs))) {
break;
}
if (PyLong_CheckExact(lhs)) {
_Py_SET_OPCODE(*instr, BINARY_OP_MULTIPLY_INT);
goto success;
}
if (PyFloat_CheckExact(lhs)) {
_Py_SET_OPCODE(*instr, BINARY_OP_MULTIPLY_FLOAT);
goto success;
}
break;
case NB_SUBTRACT:
case NB_INPLACE_SUBTRACT:
if (!Py_IS_TYPE(lhs, Py_TYPE(rhs))) {
break;
}
if (PyLong_CheckExact(lhs)) {
_Py_SET_OPCODE(*instr, BINARY_OP_SUBTRACT_INT);
goto success;
}
if (PyFloat_CheckExact(lhs)) {
_Py_SET_OPCODE(*instr, BINARY_OP_SUBTRACT_FLOAT);
goto success;
}
break;
#ifndef Py_STATS
default:
_Py_SET_OPCODE(*instr, BINARY_OP);
return;
#endif
}
SPECIALIZATION_FAIL(BINARY_OP, binary_op_fail_kind(oparg, lhs, rhs));
STAT_INC(BINARY_OP, failure);
cache->counter = ADAPTIVE_CACHE_BACKOFF;
return;
success:
STAT_INC(BINARY_OP, success);
cache->counter = initial_counter_value();
}
|
关键是如果一开始指令特化成功,后面传入的对象不再是原来的对象了,那应该怎么回退呢?带着这个问题,我们来到特化后的指令 BINARY_OP_ADD_FLOAT 。
可以看到,在这里就只是简单检查一下两边对象类型,然后快速的用浮点相加完成了两对象相加,这就是性能提速的原因。
DEOPT_IF 就是用来判断是否特化失效的宏,特化失败走向 miss 。
1
2
3
4
5
6
7
8
9
10
11
12
13
14
15
16
17
18
19
20
21
22
| #define DEOPT_IF(cond, instname) if (cond) { goto miss; }
TARGET(BINARY_OP_ADD_FLOAT) {
assert(cframe.use_tracing == 0);
PyObject *left = SECOND();
PyObject *right = TOP();
DEOPT_IF(!PyFloat_CheckExact(left), BINARY_OP);
DEOPT_IF(Py_TYPE(right) != Py_TYPE(left), BINARY_OP);
STAT_INC(BINARY_OP, hit);
double dsum = ((PyFloatObject *)left)->ob_fval +
((PyFloatObject *)right)->ob_fval;
PyObject *sum = PyFloat_FromDouble(dsum);
SET_SECOND(sum);
Py_DECREF(right);
Py_DECREF(left);
STACK_SHRINK(1);
if (sum == NULL) {
goto error;
}
JUMPBY(INLINE_CACHE_ENTRIES_BINARY_OP);
NOTRACE_DISPATCH();
}
|
当指令特化失效后,就会找回该特化指令原始的指令进行执行,还会尝试去再次特化该指令。
1
2
3
4
5
6
7
8
9
10
11
12
13
14
15
16
17
18
| miss:
{
STAT_INC(opcode, miss);
opcode = _PyOpcode_Deopt[opcode];
STAT_INC(opcode, miss);
_Py_CODEUNIT *counter = (_Py_CODEUNIT *)next_instr;
*counter -= 1;
if (*counter == 0) {
int adaptive_opcode = _PyOpcode_Adaptive[opcode];
assert(adaptive_opcode);
_Py_SET_OPCODE(next_instr[-1], adaptive_opcode);
STAT_INC(opcode, deopt);
*counter = ADAPTIVE_CACHE_BACKOFF;
}
next_instr--;
DISPATCH_GOTO();
}
|
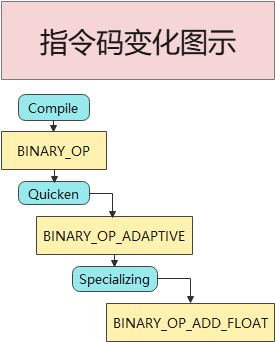
整个指令的变化可以参考下图。
![python3-specializing]()
至此我们的分析结束,指令特化真好玩,下次(一定)我就将它实现到 Lua 上。